


|
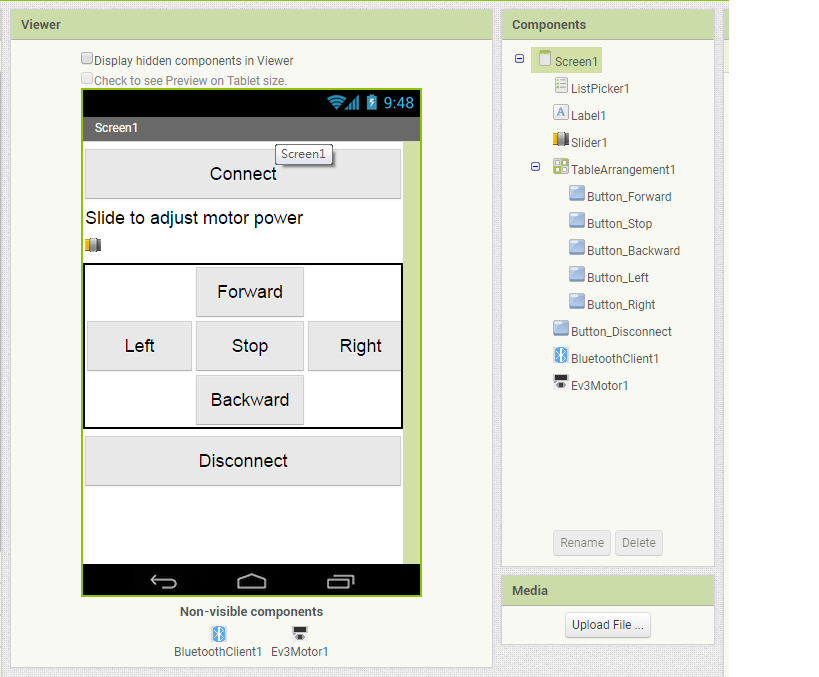
Name | Palette | Settings | Description |
ListPicker1 | User Interface | set Text to “Choose your EV3” | |
Label1 | User Interface | set Text to “Slide to adjust motor power” | |
Slider1 | User Interface | ||
TableArrangement1 | |||
Button_Forward | User Interface | set Text to “Forward” | Click to make robot go forward. |
Button_Backward | User Interface | set Text to “Backward” | Click to make robot go backward |
Button_Left | User Interface | set Text to “Left” | Click to make robot turn left. |
Button_Right | User Interface | set Text to “Right” | Click to make robot turn right. |
Button_Stop | User Interface | set Text to “Stop” | Click to make robot stop. |
Button_Disconnect | User Interface | set Text to “Disconnect” | Click to disconnect from EV3 brick. |
Ev3Motor1 | LEGO® MINDSTORMS® | set BluetoothClient to BluetoothClient1 | Control and get status of Ev3 Motor, MotorPorts is BC. |
BluetoothClient1 | Connectivity | Communication between AI2 and Lego EV3 brick |
Blocks
STEP1 Initialize:
First we use a variable (power) to represent motor power, with initial value 100. We will set it’s value in Slider.positionChanged event to further control motor power.
In ListPickerConnect.BeforePicking event, we have to set its element to BluetoothClient1.AddressAndNames. After that we can connect(BluetoothClient1.Connect) our paired EV3 in ListPickerConnect.AfterPicking event. If connect sucessfully, Listpicker will be set to unable, but other button will be set to enabled for user to operate. (Figure 3).

Figure 3. Initialze and connection
STEP2 Forward and Backward button:
Except for Button Stop, other four buttons will call Ev3Motors1.RotateSyncInDuration command when clicked, with different turnRatio and power. Take Button_Forward for instance, we have these parameters: power variable, 2000(ms), 0 (means two motor with same speed and true (break when execution complete).
Notice that everytime you click the button will let robot do something for 2 seconds, you can modify the millisecond field or change to RotateSyncIndefinitely command. It will let your robot more gentle。
.png)
Figure 4. RotateSyncIndefinitely command
As for Button_Backward, we simply multiply variable power with -1 to make motors turn in the opposite direction (same power). Your robot will then move backward (Figure 5).
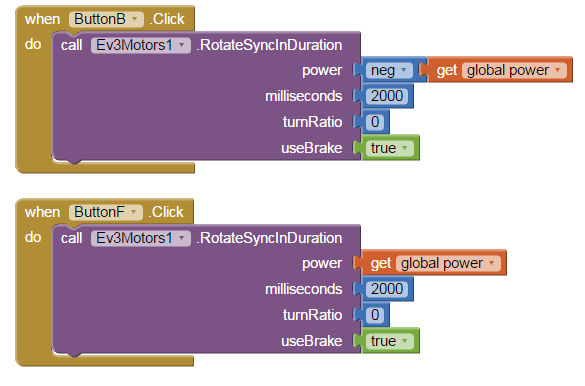
Figure 5. Forward and backward.
STEP3 Left, Right turn and stop:
Button_Left and Button_Right are almost the same idea, but this time we set turnRatio to -200 (turn left) and 200 (turn right). You can set turnRatio to higher value(max is 100) to make a sharper turn.
Finally click Button_Stop to stop the robot, you can use RatateSync command with 0 power to achieve the same effect. (Figure 6).
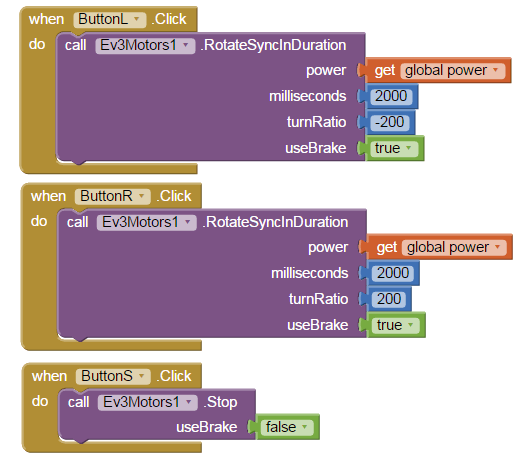
Figure 6. Turn left, right and stop.
STEP4 Slider to control motor speed
In slider.positionChanged event, we set power variable to slider’s thumb position, therefore the motor power is changed as well (0~100).

圖7 set power variable to slider’s thumb position.
STEP5 Disconnect:
When Button_Disconnect is pressed(Button_Disconnect.Click event), we ask BluetoothClient to disconnect from EV3 brick, set buttons and listpicker to original status, waiting for next connection. Like Figure 7.
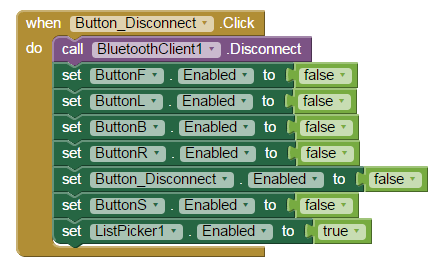
Figure 8. Disconnect from bluetooth device
Play
You must pair with your EV3 robot first, then press its power button and check EV3’s BT is switched on. Press the [Choose your EV3] listpicker and choose the name of the paired EV3, then all the control button will be enabled to click. Please click each button to see how robot moves and also drag the slider to adjust motor power. You can build a maze and see who is the best maze conqueror in the class!!
Connect your EV3
App starts up like Figure 9, please click Connect listpicker and select your EV3 (figure 10). Click and connect successfully, you can click five buttons in the middle of the app to control your robot. Enjoy~
Click Disconnect button to closebluetooth connection with EV3,
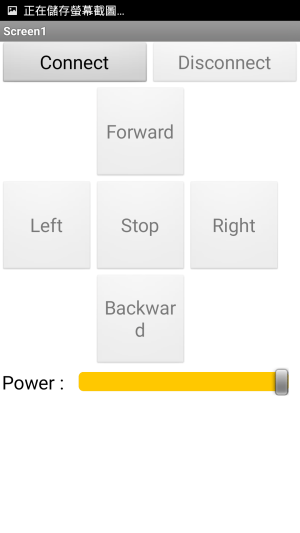

Figure9. 10 Start screen and select EV3